


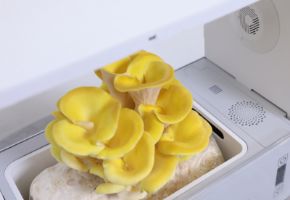


Pleurotus mushrooms, also known as oyster mushrooms, are among the most appreciated both in cooking and for their nutritional properties. The key to successful cultivation lies in preparing a high-quality Pleurotus substrate that provides all the necessary nutrients for the mycelium to thrive. In this guide, we will explore every aspect of creating the perfect substrate, from raw materials to preparation techniques, including scientific insights and practical tips.
Before diving into practice, it's essential to understand why the substrate plays such a decisive role in Pleurotus cultivation. Unlike green plants, which synthesize their own nutrients through chlorophyll photosynthesis, fungi are heterotrophic organisms that depend entirely on the substrate for energy and nutrients. This fundamental difference transforms the substrate from a simple support to a true "external digestive system" for our Pleurotus. Pleurotus belongs to the category of lignicolous fungi, a technical term indicating their natural tendency to grow on decaying wood. In nature, these extraordinary organisms play a crucial ecological role as primary decomposers, capable of breaking down even the resistant lignin that constitutes the structure of tree trunks. A groundbreaking 2020 study published in the Journal of Fungi unequivocally demonstrated how the substrate composition directly influences: According to the best manuals on mushroom cultivation, there are four indispensable pillars for creating a high-quality Pleurotus substrate: Lignin (15-20%) and cellulose (35-45%) represent Pleurotus' favorite feast. These complex polysaccharides, which constitute wood's structure, are broken down by extracellular enzymes (laccases and peroxidases) produced by the mycelium. Porosity (40-60% air space) is crucial to ensure: It must maintain 60-75% moisture without compacting. The practical test? Squeeze a handful of substrate: A pH between 5.5 and 6.5 creates: Pro Tip: Adding 2% agricultural gypsum (calcium sulfate) stabilizes the pH and improves the structure! The choice of substrate materials represents the first, crucial step toward successful cultivation. There is no single perfect solution, but rather a series of options we can adapt based on: Now let's examine in detail the main material categories, with their pros, cons, and secrets for optimal use. Wheat, barley, or oat straw has been for decades the standard choice for Pleurotus growers worldwide. According to data from the Food and Agriculture Organization (FAO), over 60% of commercial cultivations use this material, and for good reasons: Sometimes simple adjustments can make a big difference in creating an excellent Pleurotus mushroom substrate. We can examine three crucial phases... Phase 1: selection and cutting Phase 2: deep hydration Phase 3: Heat treatment 💡 Expert tip: after treatment, squeeze the straw well—you should get a few water drops, not a continuous flow. This is the perfect hydration level! For high-end cultivations or particular species like Pleurotus ostreatus var. columbinus, hardwood sawdust represents the premium choice. Research from the University of Georgia showed that oak sawdust: Each mushroom has its preferences; in the case of Pleurotus Ostreatus, it can be cultivated on 4 tree species. ⚠️ Avoid at all costs: resinous woods (pine, fir), chemically treated or painted wood, sawdust that's too fine (under 2mm). To prepare sawdust, certain proportions in mixtures must be respected. Generally, we start with a base that can eventually be enriched with additional nutrients. Base mixture: Recommended process: Mushrooms don't live on wood alone! The latest frontier in mushroom cultivation focuses on circular solutions that transform waste into resources. A meta-analysis published on ScienceDirect shows that Pleurotus can grow on over 120 unconventional substrates, sometimes with surprising results. Let's see which ones... Now well-known to enthusiasts who have been cultivating mushrooms for a while, these waste products can work very well as a main substrate ingredient. Advantages How to use them Compared to coffee, cotton waste is less known, as it's harder to find ready-to-use substrates based on this ingredient on the market. Advantages How to use them Advantages How to use them After numerous experiments, some startups have produced a winning mix using brewery spent grains (production waste) at 60% and straw at 40%. The results: The secret? The spent grains provide proteins and micronutrients that stimulate the mycelium. Transforming raw materials into an optimal Pleurotus substrate is an art combining scientific precision and practical sensibility. Each phase of this process, from initial hydration to final inoculation, directly influences the yield and quality of your cultivation. In this informative journey, we'll reveal all the secrets learned through years of research. Material preparation varies depending on the type of raw material used: Preliminary soaking (12-24 hours) isn't just superficial wetting but a process that: 🔍 Expert detail: Use warm water (40-45°C) to accelerate hydration. Check that the straw is completely submerged using weights. Preparation requires different attention: The sawdust should reach 60-65% moisture—when squeezed, it shouldn't drip but stay compact. Pasteurization at 65-75°C for 2-4 hours represents the gold standard for Pleurotus. Research from the University of Pennsylvania shows this method: Even at home, with the right tools, a highly respectable heat treatment can be achieved. Materials needed Procedure ⚠️ Warning: Never exceed 80°C in pasteurization—you'd destroy precious nutrients! This delicate phase requires precision and optimal hygienic conditions because even a small, trivial mistake could undo all the previous work. The substrate must reach 25-28°C throughout its volume: Never inoculate above 30°C: it would kill the mycelium! For good seeding, sheltered from risks, there are additional precautions to keep in mind. Dosage 3-5% spawn relative to substrate weight (e.g., 30-50g per kg) Best methods Alternate 5cm layers of substrate with a thin layer of spawn. Ideal for bags or containers. Thoroughly mix spawn and substrate. Best for beds or logs. Insert spawn in small pockets. Used for supplemented substrates. Ideal conditions After inoculation, lightly compress the substrate to: But be careful not to over-compact: the mycelium needs oxygen! The phase following inoculation represents the most critical period for Pleurotus cultivation. A perfectly prepared substrate can still fail if ideal conditions aren't maintained during colonization. In this section, we'll explore not only the fundamental parameters but also solutions to the most common problems generally encountered by those approaching professional cultivation. For mycelium colonization, it's necessary to reduce the temperature and maintain high, constant humidity. Ideal range: 24-28°C (varies slightly depending on the species) 🌡️ Practical advice: using a digital thermometer with a probe allows monitoring the temperature inside the substrate, not just the environment. Relative humidity: 85-95% Problems that may arise To maintain constant humidity, using a digital hygrometer and, if necessary, an ultrasonic humidifier with a timer is recommended. Frequency: 2-3 air exchanges per day Why it's crucial: ⚠️ Attention: it's important to avoid direct air currents on the substrate, as they can cause localized dehydration. Let's now analyze the possible issues that may arise during Pleurotus cultivation. Identification: green, blue, or black spots with rapid growth Main causes: Solutions: Symptoms: stunted or absent growth after 7-10 days Differential diagnosis: Fermentation/sour smell: indicates bacterial growth Approach: For advanced remediation techniques and professional protocols, we invite you to also consult other articles on mushroom cultivation on Naturnext. Pleurotus hides potential that goes far beyond food production. These extraordinary creatures are revolutionizing fields ranging from ecology to bioengineering. Let's explore together the most fascinating research frontiers. Numerous studies, including research published in the Journal of Hazardous Materials, have documented Pleurotus' extraordinary capacity to degrade: A pilot study in Ecuador demonstrated how Pleurotus ostreatus colonies remediated land contaminated by crude oil in just 4 months, with costs 70% lower than traditional methods. These fungi's ability to grow on over 70 different substrates (source: Journal of Fungi) makes them true versatility champions: The Pleurotus genome reveals: This metabolic plasticity makes them ideal for circular economy applications. Scientists are exploring: Being able to independently create a substrate represents the path toward self-sufficiency in mushroom cultivation, as it allows achieving many goals. By preparing the substrate personally: "After years of commercial substrates, switching to self-production doubled my yield" - Marco, amateur grower With often free or low-cost materials: * Savings calculated annually for hobby growers It's possible to adapt the substrate to: Creating substrates allows learning about: Acquired skills: It's possible to use agricultural or industrial waste available in your area, reducing environmental impact By keeping a detailed journal, successes can be replicated and failures analyzed The joy of seeing mushrooms grow from a substrate created with your own hands is priceless It's advisable to start with simple mixes (straw + bran) and as experience is gained, begin experimenting with: It's also true that each Pleurotus variety has different preferences: if you've really tried and can't succeed, you can start cultivation with pre-inoculated substrates, like those you can find here. The fungal kingdom is a universe in continuous evolution, with new scientific discoveries emerging every year about their extraordinary benefits for gut health and overall well-being. From now on, when you see a mushroom, you will no longer think only of its taste or appearance, but of all the therapeutic potential it holds in its fibers and bioactive compounds. ✉️ Stay connected - Subscribe to our newsletter to receive the latest studies on: Nature offers us extraordinary tools to take care of our health. Fungi, with their unique balance between nutrition and medicine, represent a fascinating frontier we are only beginning to explore. Continue to follow us to discover how these extraordinary organisms can transform your approach to well-being.Why is the substrate crucial for Pleurotus?
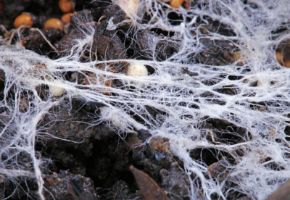
The symbiotic relationship between Pleurotus and its substrate
The architecture of the perfect substrate: fundamental characteristics
Ideal biochemical composition
Optimal physical structure
- Efficient gas exchange
- Three-dimensional mycelium development
- Prevention of anaerobic zonesBalanced water management
- Ideal: a few water drops
- Too dry: no drops
- Too wet: continuous drippingAcid-base balance
- A favorable environment for the mycelium
- A natural barrier against many competitors
- Greater nutrient availabilityMaterials for preparing Pleurotus substrate: the complete guide to possible choices
Cereal straw: the workhorse of mushroom cultivation
Advantages
Limitations
Optimal straw preparation: the small secrets of professionals
A trick is to choose golden, non-moldy straw, preferably from the latest harvest. Cut it into 3-5 cm pieces (I use a modified garden shredder) to increase the available surface area for the mycelium by 40%.
Soaking in warm water (40°C) for 12-24 hours with:
Pasteurization at 65-75°C for 2-4 hours (steam or water) is sufficient for straw. For supplemented substrates, sterilization at 121°C for 1-2 hours is better.
Hardwood sawdust: when quality surpasses quantity
Recommended wood types (in order of preference):
Professional sawdust preparation
70% hardwood sawdust (aged 1-2 months)
20% wood chips or flakes (for aeration)
10% wheat bran (as a nutritional supplement)
1. Sieving to remove dust and overly fine fragments
2. Hydration to 60-65% (weigh dry sawdust first)
3. Sterilization at 121°C for 90 minutes (essential for supplemented substrates)
4. Cooling in a controlled environment before inoculation
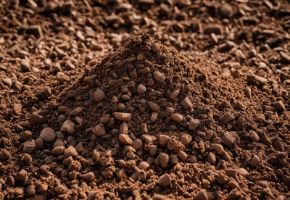
Alternative materials: when innovation meets sustainability
Coffee grounds
- Already partially sterilized
- Rich in nitrogen (up to 2%)
- Naturally acidic pH (5.0-5.5)
Mix 50% with shredded cardboard. Pasteurize at 70°C for 1 hour. Average yield: 150-200g per kg of substrate.Cotton waste
- Very high cellulose content (90%)
- Ideal fibrous structure
- Available as industrial waste
Hydrate well (they absorb a lot of water). Add 5% gypsum. Sterilize at 121°C for 60 minutes.Corrugated cardboard
- Available everywhere
- Easy to work with
- Low cost
Shred and hydrate. Pasteurize at 65°C for 2 hours. Add 10% bran as a supplement.Casestudy: brewery waste
Step-by-step process to create the perfect Pleurotus substrate
Material preparation: the foundation of success
For straw-based substrates
For sawdust-based substrates
Heat treatment: the hygienic breakthrough
Effective and safe DIY method
Cooling and inoculation: the magic moment
Controlled cooling
Professional inoculation techniques
Layering
Complete mixing
Spot inoculation
Post-inoculation care
Pleurotus substrate maintenance: complete guide to post-inoculation management
Optimal conditions for substrate colonization
Temperature control
Humidity management
Ventilation and gas exchange
Frequent problems and tested solutions
Mold contaminations (Trichoderma, Penicillium)
Mycelium that doesn't colonize
Cause Specific symptoms Solution Temperature too low Zero growth or limited to inoculation points Increase temperature to 25-28°C Substrate too dry White but fragile mycelium, shrinking substrate Spray sterile water Non-viable spawn No growth under any conditions Replace spawn Unpleasant odors
Pleurotus: beyond cultivation
Pleurotus as super-bioremediators
Petroleum hydrocarbons
Organochlorine pesticides
Industrial dyes
Pleurotus' unparalleled adaptability
Unusual substrates successfully tested
Genetic secrets of adaptability
Future research frontiers
Why create a Pleurotus substrate autonomously
Total quality control
Substantial economic savings
Material Commercial cost Self-produced cost Base substrate (10kg) 15-20€ 2-5€ Premium substrate 25-30€ 5-8€ Advanced customization
Practical learning
DIY process advantages
Local materials
Repeatable results
Personal satisfaction
Expert advice
Continue your journey into the world of fungi